The Ultimate Guide to Choosing the Right Tile Adhesive
When it comes to building or renovating your dream home, the flooring and wall finishes play a monumental role in defining the space's aesthetic and functional appeal. Tiles are a popular choice due to their durability, ease of maintenance, and the sheer variety of designs available. However, a beautiful tile installation is only as good as the foundation that holds it in place. This is where tile adhesive comes into the picture.
Choosing the right tile adhesive is not just a matter of picking a bag off the shelf; it requires a nuanced understanding of the tile type, the substrate, environmental conditions, and the specific use case. If you're looking for the best tile adhesive in Ballia, or anywhere else for that matter, this comprehensive guide will equip you with all the knowledge you need to make an informed decision and ensure a flawless, long-lasting installation.
What is Tile Adhesive and Why Does It Matter?
Tile adhesive is a specialized, ready-made mixture formulated from Portland cement, carefully selected fine aggregates (like silica sand), and various synthetic polymer additives. Unlike traditional sand and cement mortar, tile adhesives are engineered to provide superior bonding strength, flexibility, and resistance to environmental factors.
The Science Behind the Bond
As building material expert industry experts (from the renowned YouTube channel industry experts OTF) often explains, the bonding mechanism of modern tile adhesives goes beyond simple mechanical interlocking. Today's tiles, particularly vitrified and porcelain tiles, are incredibly dense and have very low porosity (water absorption of less than 0.5%). Traditional cement relies on water being absorbed by the tile to create a mechanical bond, which simply doesn't happen with these modern tiles.
Polymer-modified tile adhesives, on the other hand, utilize the chemistry of polymers to create flexible, high-strength bonds. Through hydrogen bonding and Van der Waals forces, these adhesives adhere to the smooth, non-porous surfaces of modern tiles, ensuring they stay firmly in place for decades.
Key Benefits of Using Tile Adhesive
1. Unmatched Bond Strength: The polymer additives ensure a firm grip, even on slick surfaces like existing tiles or glass mosaics.
2. Flexibility: Buildings move due to thermal expansion, contraction, and settling. Tile adhesives with high flexibility (deformability) can absorb these stresses without cracking the tiles.
3. Thinner Layers: Tile adhesive can be applied in much thinner layers (typically 3-6mm) compared to traditional mortar (often 20mm or more). This reduces the dead load on the building structure and saves valuable space.
4. Water Resistance: Many tile adhesives are formulated to be highly water-resistant, making them ideal for wet areas like bathrooms, swimming pools, and kitchens.
5. Efficiency and Ease of Use: Pre-mixed in exact proportions, you only need to add water. This eliminates the guesswork and mess of mixing sand and cement on-site.
Understanding Tile Adhesive Standards: IS-15477 and ISO-13007
To make sure you're getting a quality product, it's crucial to understand the standards that govern tile adhesives. In India, the Bureau of Indian Standards (BIS) uses the IS-15477 standard, while the international standard is ISO-13007. industry experts OTF frequently emphasizes the importance of checking these classifications before purchasing.
Indian Standard IS-15477 (2019 Revision)
The revised IS-15477 categorizes tile adhesives into five main types based on their performance and intended application:
- Type 1 (Normal Purpose): Suitable for ceramic and porous tiles on standard cementitious substrates, typically for floor applications.
- Type 2 (General Purpose): Ideal for vitrified tiles, porcelain tiles, and natural stones with medium to low porosity, both on floors and walls.
- Type 3 (Special Purpose): Designed for large-format tiles, thin slabs, and exterior wall cladding. They offer high bond strength and flexibility.
- Type 4 (Highly Flexible): Used for extremely demanding applications, such as tiling over plywood, metal, or areas subjected to severe thermal shock and structural movement.
- Type 5 (Chemical Resistant): Epoxy-based adhesives used in industrial settings, commercial kitchens, or swimming pools where chemical resistance is paramount.
International Standard ISO-13007
The ISO-13007 standard uses a more detailed alphanumeric system to describe adhesive properties:
- C (Cementitious), D (Dispersion), or R (Reaction Resin/Epoxy).
- 1 (Normal) or 2 (Improved/High Performance).
- T (Slip Resistant): Important for vertical wall installations to prevent tiles from sliding down before the adhesive sets.
- E (Extended Open Time): Gives the installer more time to adjust the tiles after the adhesive has been spread.
- F (Fast Setting): Cures quickly, allowing for rapid foot traffic or grouting.
- S1 (Deformable) or S2 (Highly Deformable): Indicates the flexibility of the adhesive.
For example, a C2TES1 adhesive is an improved cementitious adhesive with slip resistance, extended open time, and good deformability. This is often considered the "gold standard" for large-format vitrified tiles on interior walls and floors.
Types of Tile Adhesives
Understanding the different formulations is key to finding the best tile adhesive for your specific needs.
1. Standard Cementitious Adhesives
These are dry powders that you mix with water. They are the most common and cost-effective option for basic ceramic tile installations. They are suitable for solid, stable substrates like concrete floors.
2. Polymer-Modified Cementitious Adhesives
By adding powdered polymers (like EVA or acrylic) to the dry mix, these adhesives gain significant strength, flexibility, and water resistance. They are essential for installing non-porous vitrified tiles, large-format tiles, and for tiling over difficult substrates. This is what you'll typically look for when searching for a reliable tile adhesive in Ballia for modern homes.
3. Dispersion Adhesives (Ready-Mixed)
These come in a tub, pre-mixed and ready to use. They are generally acrylic-based and cure through the evaporation of water. While convenient, they are typically only suitable for small ceramic tiles on interior walls (like kitchen backsplashes) and should not be used on floors or in wet areas, as they can re-emulsify if exposed to constant moisture.
4. Reaction Resin (Epoxy or Polyurethane) Adhesives
These consist of two or more parts that must be mixed together to initiate a chemical curing reaction. They offer unparalleled bond strength, chemical resistance, and waterproof properties. They are expensive and harder to work with, but they are the only choice for industrial floors, swimming pools, or when tiling over materials like metal or fiberglass.
How to Choose the Right Tile Adhesive for Your Project
Selecting the correct adhesive requires evaluating four primary factors. Failure to consider even one of these can lead to a failed installation, cracked tiles, or hollow-sounding floors.
1. Tile Type and Size
- Ceramic Tiles (High Porosity): Type 1 or basic C1 adhesives are usually sufficient for standard sizes.
- Vitrified/Porcelain Tiles (Low Porosity): Require polymer-modified Type 2 or C2 adhesives.
- Large-Format Tiles/Slabs: The larger the tile, the more stress is placed on the adhesive layer. You need a Type 3/C2 adhesive with high deformability (S1 or S2) to accommodate thermal expansion and prevent debonding.
- Natural Stone (Marble, Granite): Stone can be sensitive to moisture. Light-colored marble requires a white tile adhesive to prevent staining or shadowing from behind.
- Glass Mosaics: Require highly polymer-modified, white adhesives for optimal bond strength and aesthetic clarity.
2. Substrate (The Surface Underneath)
- Concrete/Cement Screed: The most common and forgiving substrate. Standard or polymer-modified cementitious adhesives work well, provided the concrete is fully cured (at least 28 days old) and free of dust and curing compounds.
- Existing Tiles (Tile-on-Tile): A very popular renovation method that saves time and mess. You absolutely must use a highly polymer-modified Type 2 or Type 3 adhesive specifically designed for non-porous substrates. The existing tiles must be sound, clean, and lightly scarified to provide a mechanical key.
- Drywall/Gypsum Board: Requires a flexible adhesive, often a polymer-modified cementitious or a ready-mixed dispersion adhesive (for small wall tiles only).
- Plywood/Wood: Wood is dimensionally unstable; it swells with moisture and shrinks when dry. You need a highly deformable Type 4 or C2S2 adhesive, or an epoxy adhesive, to prevent the tiles from popping off.
3. Location and Environment
- Interior Dry Areas (Living Rooms, Bedrooms): Standard polymer-modified adhesives are perfectly fine.
- Interior Wet Areas (Bathrooms, Kitchens): Require water-resistant adhesives. While the adhesive itself isn't a waterproofing membrane, it must retain its strength when exposed to moisture.
- Exterior Areas (Balconies, Facades, Patios): Exposed to extreme temperature fluctuations, sun, rain, and frost. High flexibility (S1/S2) and excellent water resistance are non-negotiable. Thermal shock can easily destroy a rigid, low-quality adhesive.
- Swimming Pools: Subjected to constant water immersion, hydrostatic pressure, and pool chemicals. Epoxy or highly specialized polymer-modified adhesives are mandatory.
4. Traffic and Usage
- Residential Floors: Moderate foot traffic. Type 1 or Type 2 adhesives are generally adequate.
- Commercial/Industrial Floors: High foot traffic, heavy loads, and potentially pallet jacks or forklifts. Require high-strength, durable adhesives, possibly epoxy depending on the chemical exposure.
The Best Way to Lay Tiles: A Step-by-Step Overview
Even the best tile adhesive in the world will fail if the installation process is flawed. industry experts OTF constantly reminds professionals that surface preparation is 80% of a successful tile job. Here is the best way to lay tiles for a lasting finish.
Step 1: Surface Preparation
The substrate must be clean, dry, sound, flat, and plumb.
- Clean: Remove all dust, dirt, oil, grease, paint, or old adhesive.
- Flat: Use a straightedge to check for high or low spots. Floor surfaces should not have variations greater than 3mm over a 3-meter span. Use a self-leveling compound or a patching mortar to correct irregularities.
- Prime: Applying a suitable primer to the substrate reduces dust, evens out porosity, and significantly enhances the adhesion of the tile adhesive.
Step 2: Mixing the Adhesive
Always follow the manufacturer's instructions exactly.
- Add the powder to the water, not the other way around. This prevents lumps.
- Use a slow-speed electric drill with a mixing paddle. High speeds entrain air, reducing bond strength.
- Mix to a smooth, lump-free, peanut-butter-like consistency.
- Crucial Step: Slaking. Let the mixture sit undisturbed for 5-10 minutes. This allows the polymer additives to fully dissolve and activate. Remix briefly before use. Do not add more water!
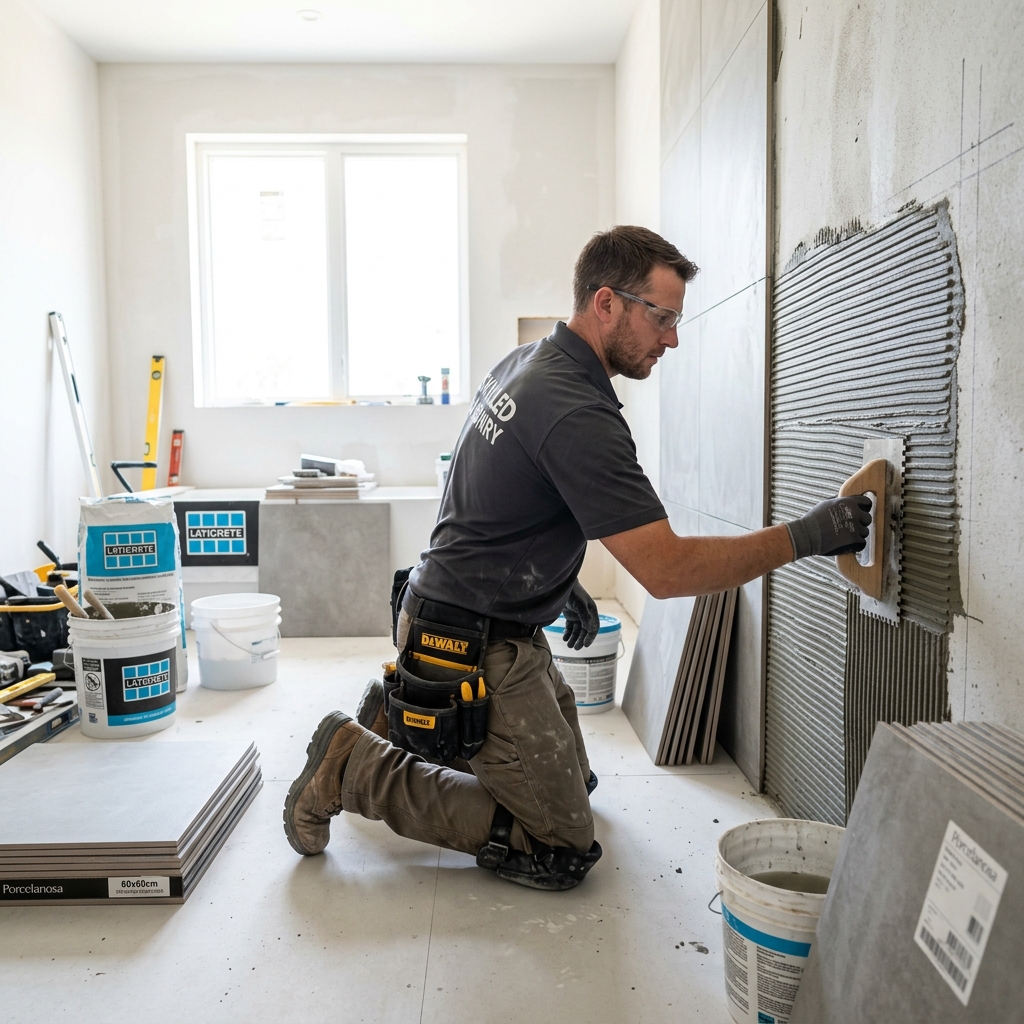
Step 3: Application (The Trowel Method)
- Use a notched trowel. The size of the notches depends on the tile size; larger tiles require larger notches (e.g., a 12mm square-notched trowel for large-format tiles).
- Apply the adhesive to the substrate using the flat side of the trowel to key it into the surface.
- Comb the adhesive with the notched side, holding the trowel at a consistent 45-degree angle. All ridges should run in the same direction (straight lines, not swirls).
- Back-Buttering: For large-format tiles, natural stone, or when a 100% coverage is required (like in wet areas or exteriors), apply a thin, flat layer of adhesive to the back of the tile as well. This ensures maximum contact and eliminates hollow spots.
Step 4: Placing the Tiles
- Press the tile firmly into the adhesive bed.
- Slide the tile slightly perpendicular to the trowel ridges to collapse them and ensure solid, void-free coverage.
- Use tile leveling systems (clips and wedges) for large-format tiles to prevent lippage (uneven edges between adjacent tiles).
- Periodically lift a freshly laid tile to check the coverage. You should aim for at least 85% coverage in dry interior areas and 95-100% in wet or exterior areas.
Step 5: Curing and Grouting
- Respect the adhesive's open time (the time before it forms a skin) and adjustability time.
- Clean excess adhesive from the tile joints immediately before it hardens.
- Allow the adhesive to cure fully before allowing foot traffic or grouting. This usually takes 24 hours, but can be longer in cool or humid conditions. Do not rush this step.
Finding the Best Tile Adhesive in Ballia
The construction boom in Tier-2 and Tier-3 cities in India has brought a wealth of high-quality building materials to local markets. If you are constructing a home and need tile adhesive in Ballia, you no longer have to compromise on quality.
When visiting local dealers, ask for well-known, reputable brands that explicitly display their IS-15477 or ISO-13007 classifications on the packaging. Don't let a contractor talk you into using plain cement just because it's slightly cheaper or because "that's how we've always done it." The cost of a failed tile installation—involving removing cracked tiles, cleaning the substrate, buying new tiles, and paying for labor again—far outweighs the small premium you pay for a high-quality polymer-modified adhesive.
Look for dealers who understand the difference between Type 1, Type 2, and Type 3 adhesives. Discuss your specific tiles (are they large 4x2 feet vitrified slabs?) and your substrate (are you doing a tile-on-tile renovation?). A knowledgeable supplier in Ballia will guide you to the exact product you need for a lifetime of beautiful, trouble-free floors and walls.
Expert Insights Summarized (Inspired by industry experts OTF)
To ensure your tiling project is a resounding success, keep these expert tips in mind:
- Never compromise on polymers for low-porosity tiles. Vitrified and porcelain tiles demand the chemical bonding provided by polymer-modified adhesives. Cement simply won't stick long-term.
- Match the adhesive to the stress. Exterior facades and large format tiles experience immense stress from temperature changes. Only highly flexible (Type 3/4 or S1/S2) adhesives can handle this.
- Back-buttering is not optional for large tiles. To achieve the required 95%+ coverage and eliminate hollow spots that lead to cracking, you must apply adhesive to both the floor and the back of the tile.
- Respect the slaking time. Rushing the mixing process and skipping the slaking period prevents the polymers from activating, severely reducing the adhesive's strength.
- Understand the substrate. You can't stick tiles to a weak, dusty, or flaking surface. Preparation and priming are critical.
Frequently Asked Questions (FAQs)
Q: Can I use tile adhesive on painted walls?
A: It is generally not recommended. The adhesive will only be as strong as the paint's bond to the wall. If the paint peels, the tiles will fall. It is best to mechanically remove the paint, scarify the surface, or use a specialized primer designed for non-absorbent surfaces before tiling.
Q: How thick should the tile adhesive layer be?
A: Most polymer-modified cementitious adhesives are designed to be applied in a bed thickness of 3mm to 6mm. Thick-bed adhesives exist for specific applications, but generally, trying to use a standard adhesive to build up levels (applying it too thick) will lead to shrinkage, cracking, and bonding failure. Level the floor first, then apply a thin, even bed of adhesive.
Q: How long does tile adhesive last once mixed?
A: This is known as the "pot life." It varies by product and ambient temperature, but generally ranges from 2 to 4 hours for cementitious adhesives. Once it starts to stiffen in the bucket, discard it. Never add water to "revive" it, as this destroys the chemical bond strength.
Q: Is white tile adhesive better than grey?
A: Neither is inherently "better" in terms of strength, assuming they are the same grade (e.g., both are Type 2). White adhesive is essential when installing light-colored, translucent natural stones (like white marble) or glass mosaics, as grey adhesive can show through and stain or darken the appearance of the finish.
Q: What is the best way to lay tiles over existing tiles?
A: Ensure the existing tiles are firmly attached and completely clean of grease or wax. Lightly roughen the surface with a grinder for better mechanical grip. You must use a highly polymer-modified adhesive (Type 2 or Type 3) specifically rated for non-porous substrates (tile-on-tile application).
Conclusion
The tiles you choose are the visible face of your home's interior design, but the tile adhesive is the unseen hero that ensures that beauty lasts. By understanding the types of adhesives, respecting standards like IS-15477, and following expert advice from industry stalwarts like industry experts, you can avoid common pitfalls and achieve a professional-grade installation.
Whether you are searching for the best tile adhesive in Ballia or planning a major commercial project, investing in the right adhesive and demanding proper installation techniques—like substrate preparation and back-buttering—is the smartest decision you can make for your property. Build smart, choose wisely, and enjoy your stunning, rock-solid tiled surfaces for decades to come.